Nervecentre V9.0 Help for Users
You can create a new prescription from a mobile or a desktop. You can create prescriptions with or without a dose sentence.
 What is a dose sentence?
Dose sentences are pre-configured prescriptions with varying degrees of flexibility. The dose sentence might have:
-
Pre-populated values
-
Questions that present you with a small number of options
On a desktop, you can view if a medication was prescribed with a dose sentence from the events log. You can't view this information on a mobile.
When you prescribe a medication, you can choose when the medication needs administering. Nervecentre follows rules for when to start regular doses after a stat dose, and when to start reducing or increasing doses.
Read about rules for stat doses
Read about rules for reducing and increasing doses
Creating a new prescription on a mobile
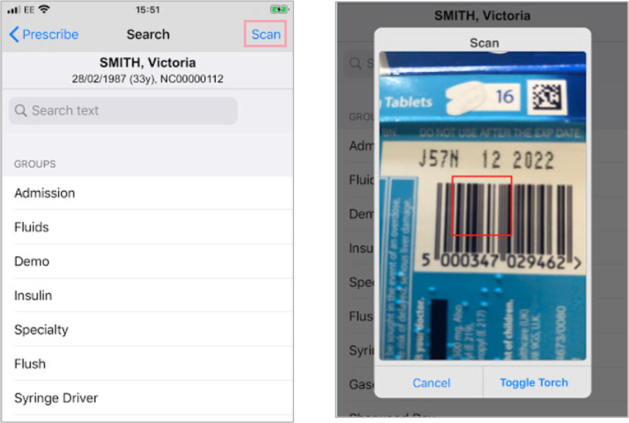
Adding a prescription by searching
-
From your patient list, select a patient, or scan a patient's wristband.
-
Select Chart > +.
-
Enter a medication in the search box.
Nervecentre searches VTMs, brands, groups, and order sets.
-
Select required medication.
-
Answer dose sentence questions.
Adding a prescription by scanning
-
From your patient list, select a patient, or scan a patient's wristband.
-
Select Chart > +.
-
To scan the medication barcode:
-
On iOS, select Scan.
-
On Android, select
 .
.
-
-
Optional: to turn on your camera's torch:
-
On iOS, select Toggle Torch.
-
On Android, select .
-
-
Scan the medication barcode.
-
Select the required medication.
-
Answer dose sentence questions.
Adding a prescription from a group
-
From your patient list, select a patient, or scan a patient's wristband.
-
Select Chart > +.
-
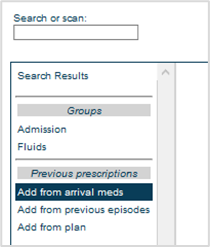
Select an option from GROUPS, or enter a group name in the search box.
Nervecentre checks if the first part of the group name matches what you entered.
-
Select groups until you reach dose sentences.
-
Select the required medication.
-
Answer dose sentence questions.
Adding a prescription from previous prescriptions
-
From your patient list, select a patient, or scan a patient's wristband.
-
Select Chart > +.
-
Select an option from PREVIOUS PRESCRIPTIONS.
-
To prescribe medications a patient arrived on, select Add from arrival meds.
-
To prescribe TTO medications from a previous visit, select Add from previous visits, then select an episode of care.
-
To prescribe medications from a previous appointment, select Add from previous appointments, then select an appointment.
-
To prescribe a planned medication, select Add from plan.
-
-
Select the required medication.
-
Answer dose sentence questions.
Prescribing with a dose sentence
You can prescribe medications and fluids with a dose sentence. Dose sentences available depend on your organisation.
Some dose sentences include questions and fields where you can enter additional information.
-
From your patient list, select a patient, or scan a patient's wristband.
-
Select Chart > +.
-
Find a medication.
-
Search the name of the medication or fluid.
-
Scan a barcode from a pack of medication.
-
Select an option from GROUPS.
-
Select an option from PREVIOUS PRESCRIPTIONS.
-
-
Select options until you reach a list of dose sentences.
You must record the patient's weight for some dose sentences to appear.
-
Select the required medication.
-
Answer dose sentence questions.
-
Dose sentence questions depend on your organisation.
-
Mandatory fields are marked . You can't prescribe until all mandatory fields are completed.
-
Some fields might be automatically populated. Select a field to edit the information.
-
For minimum intervals, you can enter a minimum interval of up to 24 hours.
-
You might see results from investigations at this stage. Results are included to provide clinical decision support.
-
To prescribe fluids sequentially, for each fluid except the first in the sequence, select the previous fluid from OR, START AFTER.
-
-
Select DOSE QUANTITY, select the required dose, and then select Done.
-
Depending on the medication, ADMIN TIMES displays. Select ADMIN TIMES to choose times for administering the medication.
For example, this might appear for Parkinson's medications, which are time-critical.
-
Select START TIME, and select a start time from the list, or enter a custom time.
-
To enter a custom time, select Enter date/time.
You are returned to the previous screen. ENTER START TIME is populated with the next available start time.
-
From ENTER START TIME, select the date and then select a new start date from the calendar.
-
Select outside the calendar.
-
Select the time and then select a new start time.
-
Select outside the time picker.
-
-
Select COURSE DURATION, enter a duration, select units, and then select Done.
-
Select INSTRUCTIONS, enter instructions, and select Back.
Select Clear to remove all the writing.
Select Cancel to return to the previous screen without making any changes.
-
Select Submit to continue.
-
Acknowledge alerts and sign the prescription.
Prescribing without a dose sentence
When you prescribe without a dose sentence, you receive only limited clinical decision support. You prescribe by answering a set of mandatory questions, for example, the route and licenced form of the medication.
-
From your patient list, select a patient, or scan a patient's wristband.
-
Select Chart > +.
-
Search the name of the medication or fluid.
-
Select options until you reach a list of dose sentences.
-
Select Prescribe without using dose sentences.
-
Answer questions for route, form, and product, then enter the frequency.
-
All questions are mandatory. You can't prescribe until all fields are completed.
-
For minimum intervals, you can enter a minimum interval of up to 24 hours.
-
-
Select DOSE QUANTITY, enter the required dose, and then select Done.
-
Depending on the medication, ADMIN TIMES displays. Select ADMIN TIMES to choose times for administering the medication.
For example, this might appear for Parkinson's medications, which are time-critical.
-
Select START TIME and select a start time from the list, or enter a custom time.
-
To enter a custom time, select Enter date/time.
You are returned to the previous screen.
-
Select ENTER START TIME. The field is populated by the current time and date.
-
Select the date and select a new start date from the calendar.
-
Select outside the calendar.
-
Select the time and then select a new start time.
-
Select outside the time picker.
-
-
Select COURSE DURATION, enter a duration, select units, and then select Done.
-
Continue to select fields and enter or select information until you see Submit.
-
Select Submit to continue.
-
Acknowledge alerts and sign the prescription.
Prescribing a syringe driver
-
From your patient list, select a patient, or scan a patient's wristband.
-
Select Chart > +.
-
From GROUPS, select Syringe Driver.
-
Select New syringe driver.
-
Complete all mandatory fields, then select Submit.
Mandatory fields are marked .
-
To add a medication to the syringe driver:
-
Select a medication.
-
Complete all mandatory fields.
Mandatory fields are marked .
-
Select Done > Submit.
You are prompted to sign the prescription.
-
-
Add more medications, or sign the prescription.
-
If you want to add any more medications to the prescription, select No.
Then repeat step 6 until you’ve finished adding medications.
-
To sign the prescription, select Yes.
-
-
Acknowledge any alerts.
-
Sign the prescription.
Read more about signing a prescription
The syringe driver now appears on the medication chart and can be administered.
About order sets
Your organisation can configure sets of medications which you can prescribe in one step. When you prescribe order sets, you don't have to add each medication individually.
To find an order set:
-
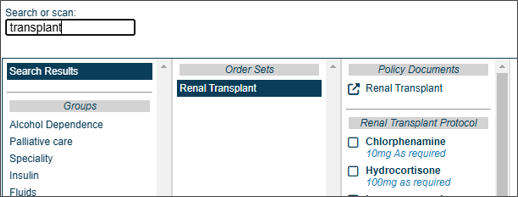
Type to search for an order set.
You can type any part of the order set name, for example, to find the order set 'Renal transplant', you can type renal or transplant.
-
Or, depending on your organisation, select a group from GROUPS.
Any order sets that belong to the group appear under ORDER SETS.
Select an order set to see the medications included.
|
|
(no icon) |
This medication is not selected. |
|
|
This medication is selected by default, or you selected this medication. |
|
|
|
This medication is a mandatory part of the order set. You can’t clear this. |
|
|
|
This medication is part of an OR group. You can select one item from an OR group. This medication is not selected. |
|
|
|
This medication is part of an OR group. You can select one item from an OR group. This medication is selected by default, or you selected this medication. Depending on your organisation, a medication in an OR group can be mandatory. A medication is selected by default. You can change the selection to another medication in the OR group, but you can’t clear the OR group entirely. |
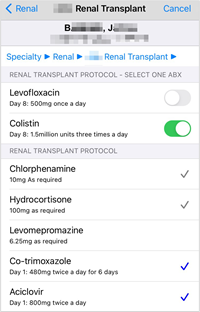 Prescribing order sets
-
From your patient list, select a patient, or scan a patient's wristband.
-
Select Chart > +.
-
Find the order set.
-
Start typing the name of the order set. You can type any part of the order set name, for example, to find the order set 'Renal transplant', you can type renal or transplant.
-
Or, depending on your organisation, select a group from GROUPS. Select sub-groups until you reach the order set, then select the order set.
-
-
Select or clear medications.
-
Select Next.
-
Acknowledge any alerts.
-
Sign the prescription.
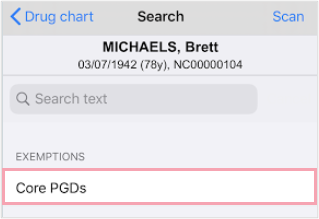
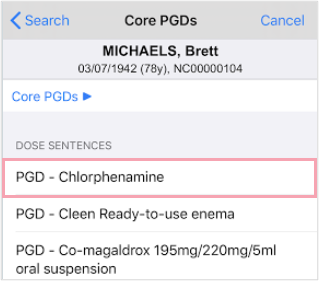
Prescribing exemptions, or Patient Group Directions (PGDs)
PGD Patient Group Directions. These provide a legal framework that allows some registered health professionals to supply and administer specified medicines to a pre-defined group of patients, without having to see a prescriber, such as a doctor or nurse prescriber. PGDs vary depending on your organisation.s, also called exemptions, allow groups of health care professionals specified by your organisation to supply or administer a medication directly to a patient with an identified clinical condition, without the need for a prescription or an instruction from a prescriber. They can also stop PGDs that have been added.
Each ward area or specialty has a designated set of PGDs. All PGDs are once-only doses.
-
From your patient list, select a patient, or scan a patient's wristband.
-
Select Chart > +.
-
Select a group of exemptions.
In this example, Core PGDs.
-
Select the required medication.
-
Enter and select any additional information to complete the prescription.
-
Acknowledge any alerts.
-
Enter notes as needed.
-
Sign the prescription.
-
To prescribe the PGD, select Sign.
Read about signing a prescription
If you signed the prescription, the PGD is added to the patient’s medication chart and can be administered.
-
To prescribe and administer the PGD, select Sign & record as given.
Read more about prescribing and administering in a single step
-
About dose range warnings
Your organisation can specify dose ranges for dose sentences and add dose range warnings.
When you prescribe a medication, if you enter a dose quantity that is outside the specified dose range, a message might appear in a dialogue box. This message is a dose range warning and you can continue to prescribe.
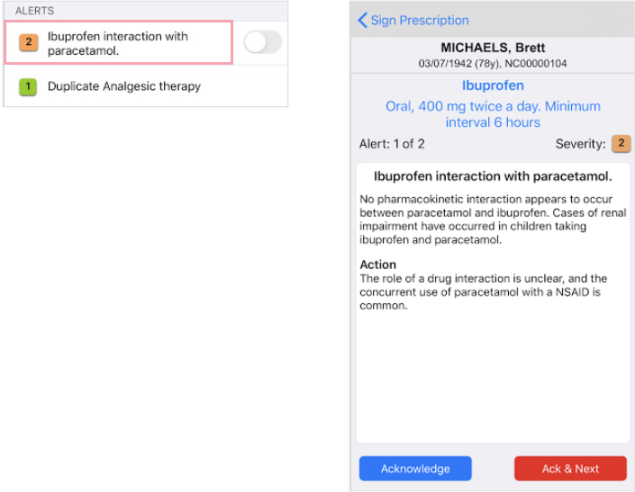
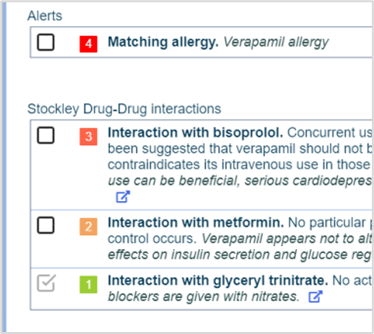
About alerts
There are four levels of alert that can appear when you sign a prescription. Alerts capture all clinical decision support, except interactions between drugs or drug classes. Stockley Drug-Drug Interactions shows interactions between drugs or drug classes.
Organisations can configure their own alerts and choose whether alert levels 1 to 3 are pre-acknowledged or need acknowledgement.
Level 4 alerts need acknowledgement and justification. You must enter a reason before you proceed. This is fully auditable.
-
When you prescribe duplicate order sets, an alert appears.
-
When you prescribe an order set containing duplicate medications, no alert appears.
-
If estimated or reported height and weight are used to calculate a dose quantity, a level 4 alert appears. Your organisation decides if estimated height and weight can be used to calculate a dose.
Signing a prescription
The final step of prescribing is signing the prescription.
-
Acknowledge any alerts.
-
To acknowledge an alert, select .

-
To view more information about an alert, select the alert.
-
Select Acknowledge to acknowledge the alert and return to the previous screen.
-
Select Ack & Next to acknowledge the alert and move on to the next alert.
-
Select Sign Prescription to return to the previous screen without acknowledging the alert.
-
-
-
To enter a note:
-
Select Additional Notes
-
Enter a note.
-
Select Sign Prescription.
Notes are mandatory if there is a level 4 alert.
-
-
Select an option.
-
To sign the prescription, select Sign.
The prescription is now added to the patient’s medication chart and can be administered.
-
To sign and administer, select Sign & record as given.
Read more about prescribing and administering in a single step
-
To delete the prescription, select Cancel.
-
Prescribing and administering medication in a single step
In some situations, a clinical user might need to prescribe and administer medications at the same time. For example, an anaesthetist working in surgery might prescribe and administer antibiotics or pain relief.
Medications that you can prescribe and administer as a single step are configured by your organisation and are limited to stat medications.
These medications are not marked in Nervecentre for mobile. However, your organisation might organise them into a single group or include 'stat' in the name of the dose sentence.
To sign and administer a prescription:
-
Follow the steps for prescribing a medication.
-
Acknowledge alerts and enter any notes.
-
Select Sign & record as given.
-
Check the time and date are correct for when you administered the dose.
To change the date and time:
-
On iOS, select the correct date and time.
-
On Android, select Change, then select the correct date and time.
-
-
To confirm the date is correct:
-
On iOS, select Confirm given at (hh:mm DD/MM).
-
On Android, select Confirm.
-
Viewing a dose calculation
You can view information about how Nervecentre calculated the dose of medication needed using the patient's weight.
-
From your patient list, select a patient, or scan a patient's wristband.
-
Select Chart.
-
Select the medication name to view information about a dose calculation.
Creating a new prescription on a desktop
Finding the prescribing page
-
From Inpatients > Patient List > double-click on a patient's name > Patient Detail, select Meds.
-
Select > to start a new prescription.
Depending on your permissions, is shown.
Searching for a medication using the search field
-
From Inpatients > Patient List > double-click on a patient's name > Patient Detail, select Meds.
-
Select > .
-
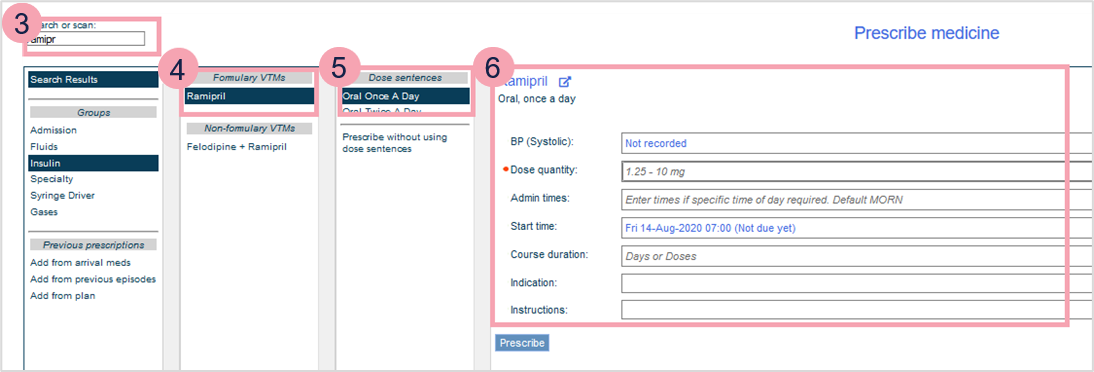
Type the first few letters of a medication name in Search or scan and press Enter.
Nervecentre searches VTMs, brands, groups, and order sets.
-
Select the medication in the next column to see dose sentences.
Formulary VTM Virtual Therapeutic Moiety. A representation of active medicinal ingredient. Information on indication, strength, dose or administration route are not included.s (Virtual Therapeutic Moieties) are listed based on the configuration of the formulary.
Depending on your permissions, you can prescribe non-formulary VTMs. If you can't prescribe non-formulary VTMs, You do not have permission to prescribe non-formulary drugs displays. You can still prescribe non-formulary VTMs if you're prescribing from arrival medications, medications from a previous visit, or medications that have a brand associated with the dose sentence.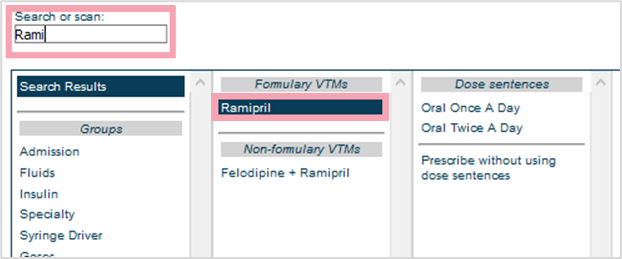
Searching for a medication using a scanner
You can scan a barcode with a wired or Bluetooth scanner connected to your desktop.
-
From Inpatients > Patient List > double-click on a patient's name > Patient Detail, select Meds.
-
Select > .
-
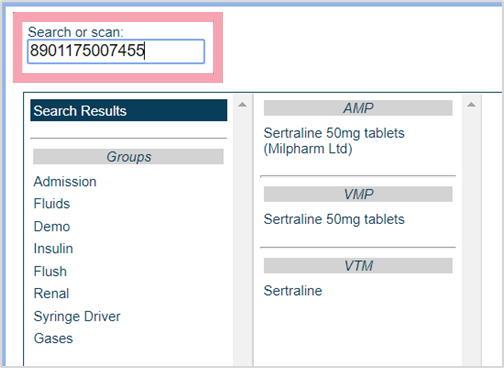
Select inside Search or scan.
-
Scan the barcode on the medication packaging.
The dm+d Dictionary of Medicines and Devices. A dictionary of descriptions and codes that represent medicines and devices in use across the NHS. code is displayed in Search or scan. Matching results appear.
-
Select a medication.
Searching for a medication using groups and folders
You can select items from Groups to move through groups of medications, treatment pathways, and order sets. The groups and folders you see depend on your organisation. Groups and folders allow you to move through clinically configured choices, providing appropriate dose sentences.
Depending on your organisation, some medications might only be available from groups and so don't appear in text searches.
-
From Inpatients > Patient List > double-click on a patient's name > Patient Detail, select Meds.
-
Select > .
-
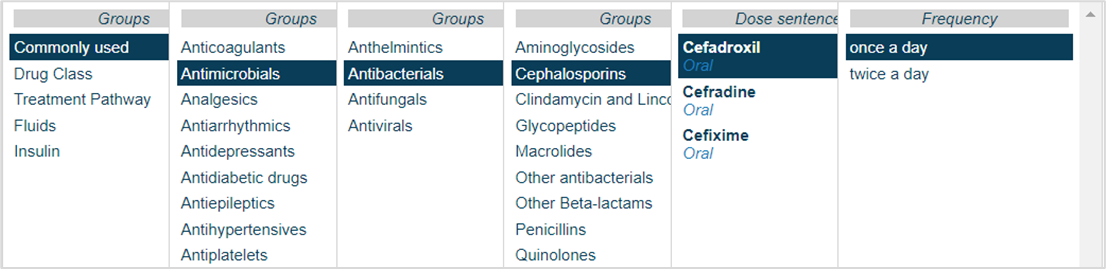
Select a group from Groups.
In this example, the group labelled Commonly used contains the washes and creams.
-
Select groups until you reach dose sentences.
-
Select a medication.
Searching for a medication from a previous prescription
-
From Inpatients > Patient List > double-click on a patient's name > Patient Detail, select Meds.
-
Select > .
-
Select an option from Previous prescriptions.
-
To prescribe medications a patient arrived on, select Add from arrival meds.
-
To prescribe TTO medications from a previous visit, select Add from previous visits, then select an episode of care.
-
To prescribe medications from a previous appointment, select Add from previous appointments, then select an appointment.
-
To prescribe a planned medication, select Add from plan.
-
-
Select a medication.
Prescribing with a dose sentence
-
From Inpatients > Patient List > double-click on a patient's name > Patient Detail, select Meds.
-
Select > .
-
Find a medication.
-
Search the name of the medication or fluid.
-
Scan a barcode from a pack of medication.
-
Select an option from Groups.
-
Select an option from Previous prescriptions.
-
-
Select an option from Formulary VTMs for medications, or Fluids for fluids.
Depending on your permissions, you can prescribe non-formulary VTMs. If you can't prescribe non-formulary VTMs, You do not have permission to prescribe non-formulary drugs displays. You can still prescribe non-formulary VTMs if you're prescribing from arrival medications, medications from a previous visit, or medications that have a brand associated with the dose sentence. -
Select a dose sentence.
You must record the patient's weight for some dose sentences to appear.
-
Depending on the dose sentence, select or enter information to complete the prescription.
-
This might include the route, dose quantity, or total fluid volume. Mandatory fields are marked .
-
For minimum intervals, you can enter a minimum interval of up to 24 hours.
-
You might see results from investigations at this stage. Results are included to provide clinical decision support.
-
To prescribe fluids sequentially, for each fluid except the first in the sequence, select the previous fluid from or, Start after.
-
-
Optional: select to view attached policies.
-
Select Prescribe.
might display next to the medication.
-
Sign the prescription, or save it as a draft.
Prescribing without a dose sentence
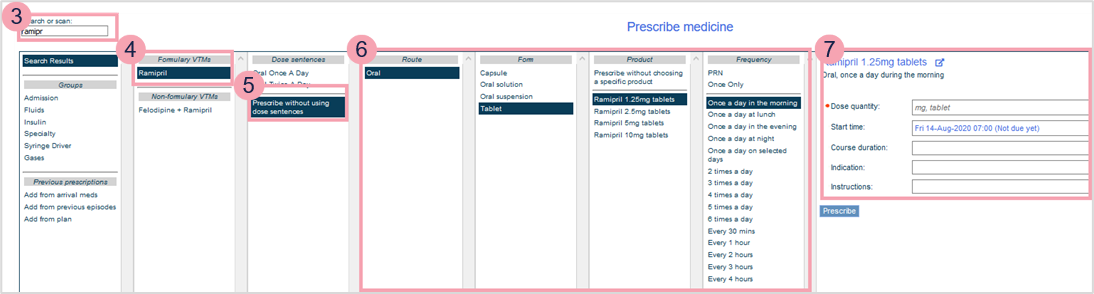
Some medications might not have a dose sentence attached. In that instance, you can select Prescribe without using dose sentences.
This method of prescribing doesn't provide full clinical decision support, such as dosing guidance. It does provide allergies, interaction, and duplication checking.
Depending on your organisation, prescribing without a dose sentence might be prohibited for some medications. For example, high-risk medications, or insulin.
-
From Inpatients > Patient List > double-click on a patient's name > Patient Detail, select Meds.
-
Select > .
-
Search the name of the medication or fluid.
-
Select an option from Formulary VTMs.
Depending on your permissions, you can prescribe non-formulary VTMs. If you can't prescribe non-formulary VTMs, You do not have permission to prescribe non-formulary drugs displays. You can still prescribe non-formulary VTMs if you're prescribing from arrival medications, medications from a previous visit, or medications that have a brand associated with the dose sentence. -
Select Prescribe without using dose sentences.
-
Select parameters for the prescription.
-
Select or enter information to complete the prescription.
-
Mandatory fields are marked .
-
For minimum intervals, you can enter a minimum interval of up to 24 hours.
-
-
Optional: select to view attached policies.
-
Select Prescribe.
-
Sign the prescription, or save it as a draft.
Prescribing an unknown medication
Depending on your organisation, you can prescribe unknown medications. You might prescribe an unknown medication when:
-
A patient brings in an arrival medication from abroad
-
A medication is for a clinical trial
-
A medication is local to your organisation
If you prescribe an unknown medication, an alert warns you that the medication is not from dm+d Dictionary of Medicines and Devices. A dictionary of descriptions and codes that represent medicines and devices in use across the NHS., so Nervecentre doesn't do any automatic checks. You must check the medication manually.
To prescribe an unknown medication:
-
From Inpatients > Patient List > double-click on a patient's name > Patient Detail, select Meds.
-
Select > .
-
Type unknown in Search or scan and press Enter.
-
Select your organisation's dose sentence for unknown medications.
-
Select parameters for the prescription.
-
Select or enter information to complete the prescription.
-
Mandatory fields are marked .
-
For minimum intervals, you can enter a minimum interval of up to 24 hours.
-
-
Optional: select to view attached policies.
-
Select Prescribe.
-
Acknowledge alerts and enter any notes.
-
Sign the prescription, or save it as a draft.
About reducing or increasing doses
Some medications need the dose to be reduced or increased throughout the course duration. Below are three examples showing you can prescribe an increasing or reducing dose.
-
Exact duration and amount specified in the dose sentence
You can prescribe a dose sentence that specifies the exact duration and amount of each reducing or increasing dose.
For example, you prescribe a medication that has the dose sentence “Oral, 20 mg once a day during the morning for 7 days THEN 10 mg once a day during the morning for 7 days”.

-
Duration specified in the dose sentence
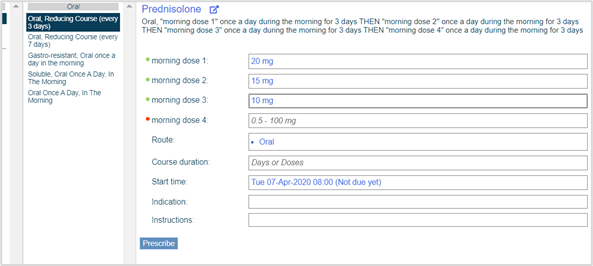
You can prescribe a dose sentence that specifies the duration of each dose, but you can enter the dose needed.
For example, you prescribe a medication that has the dose sentence is “Oral ‘morning dose 1’ once a day during the morning for 3 days THEN ‘morning dose 2’ once a day during the morning for 3 days”. When prescribing the medication, you can enter the dose needed for ‘morning dose 1’ and ‘morning dose 2’.
-
Increasing or decreasing without a dose sentence
If your organisation allows it, you can prescribe a reducing or increasing course of medication by prescribing without a dose sentence.
Read more about prescribing reducing or increasing doses without a dose sentence
The dose sentences you see depend on your organisation.
On the MAR Medicines Administration Record. Also known as drug chart. A list of all medication prescribed and administered (given)., in addition to the details given in the prescription, daily dose amounts are shown in grey.
Prescribing reducing or increasing doses without a dose sentence
You can prescribe reducing or increasing doses with or without a dose sentence.
Read about how you can prescribe reducing and increasing doses
To prescribe reducing or increasing doses without a dose sentence:
-
Start to prescribe a prescription without a dose sentence.
Read more about prescribing a prescription without a dose sentence
If the prescription includes Reducing/Increasing Dose, follow the steps below.
-
Select Reducing/Increasing Dose.
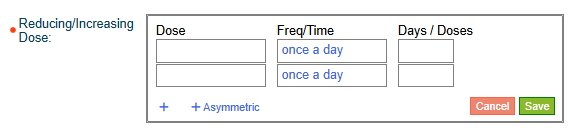
-
From Dose, enter a dose.
-
From Freq/Time, select a frequency.
-
From Days/Doses, enter a number of days or doses.
-
To add another row, select +.
-
To create asymmetric doses, select + Asymmetric, then select the number of doses per day.
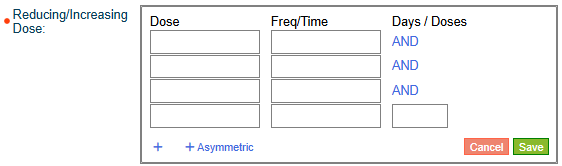
Asymmetric intermittent infusions are not supported.
-
Select Save.
-
Continue to complete the prescription.
Read more about prescribing a prescription without a dose sentence
Prescribing sequential fluids
From Nervecentre version 7.1, fluids can now be prescribed with dose sentences.
Read about prescribing with dose sentences
If one bag of fluid has been prescribed you have the option to prescribe sequential fluids.
-
Select or, Start after to view a list of prescribed fluids.
-
Select the required fluid and then select Prescribe.
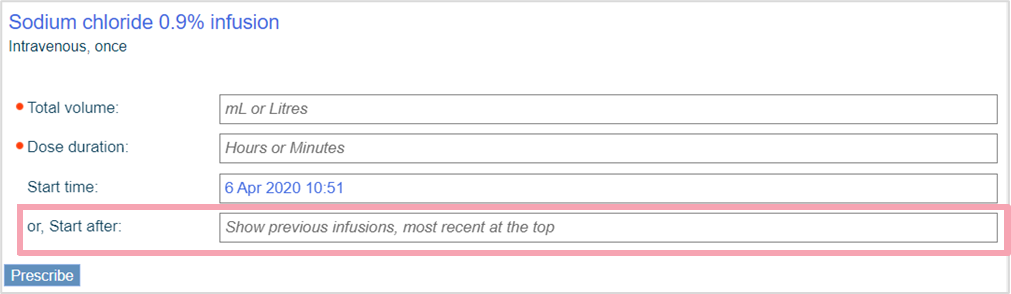
You can prescribe multiple sequences as needed.
The starting fluid must be stopped early or marked as completed on the MAR, for the sequential fluid to become due.
Prescribing syringe drivers
Syringe drivers are multiple drugs in a singe syringe used, for example, for end of life care. You must prescribe a new syringe before you can add the required medications.
-
From Inpatients > Patient List > double-click on a patient's name > Patient Detail, select Meds.
-
Select > .
-
From Groups, select Syringe Driver > New syringe driver.
-
Select or enter the required details, and then select Prescribe.
-
Select a medication for the syringe driver, select or enter the required details, and then select Prescribe.
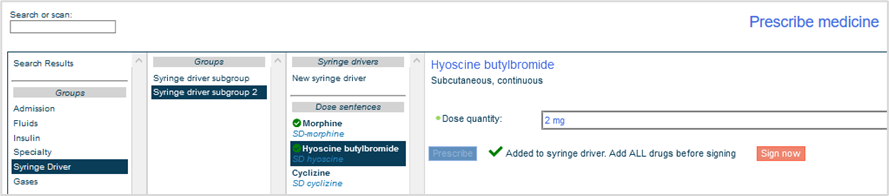
Selected medications show .
-
Optional: select more medications to prescribe.
-
Select Sign now.
If you select Sign now in error, you need to delete the draft prescription and start the process again.
-
Acknowledge any alerts.
-
Sign the prescription.
Prescribing order sets
Your organisation can configure sets of medications that you can prescribe in one step. When you prescribe order sets, you don't have to add each medication individually.
-
From Inpatients > Patient List > double-click on a patient's name > Patient Detail, select Meds.
-
Select > .
-
Find an order set.
-
Search for the name of the order set. You can type any part of the order set name, for example, to find the order set 'Renal transplant', you can type renal or transplant.
-
Or, depending on your organisation, select a group. Any order sets that belong to the group appear under Order sets.
-
-
Select an order set to see the medications included.
-
Optional: to view attached policies, select .
-
Select or clear medications.
This medication is not selected.
This medication is selected by default, or you selected this medication.
This medication is a mandatory part of the order set. You can’t clear the selection.
This medication is part of an OR group. You can select only one item from an OR group. This medication is not selected.
This medication is part of an OR group. You can select only one item from an OR group. This medication is selected, either by default or because you selected it.
Depending on your organisation, it can be mandatory to select a medication in an OR group. If so, a medication is selected by default. You can change the selection to another medication in the OR group, but you can’t clear the OR group entirely.
-
Select Next.
-
Acknowledge any alerts
-
Sign the prescription.
Prescribing exemptions, or Patient Group Directions (PGDs)
You can prescribe and administer PGDs Patient Group Directions. These provide a legal framework that allows some registered health professionals to supply and administer specified medicines to a pre-defined group of patients, without having to see a prescriber, such as a doctor or nurse prescriber. PGDs vary depending on your organisation.. PGDs, also called exemptions, allow groups of health care professionals specified by your organisation to supply or administer a medication directly to a patient with an identified clinical condition, without the need for a prescription or an instruction from a prescriber. They can also stop PGDs that have been added.
Each ward area or specialty has a designated set of PGDs. All PGDs are once-only doses.
-
From Inpatients > Patient List > double-click on a patient's name > Patient Detail, select Meds.
-
From the top-right of the MAR, select Exemptions.
A list of medications appears. This is all the medications your organisation allows you to supply or administer.
-
Select a medication.
A dialogue box appears.
-
Acknowledge any alerts.
-
Enter notes as needed.
-
Select an option.
-
To sign the prescription, select Sign.
-
To sign and administer, select Sign & record as given.
Read more about prescribing and administering in a single step
-
To delete the prescription, select Delete prescription.
-
About dose range warnings
Your organisation can specify dose ranges for dose sentences and add dose range warnings.
When you prescribe a medication, if you enter a dose quantity that is outside the specified dose range, a message might appear in a dialogue box. This message is a dose range warning and you can continue to prescribe.
About alerts
There are four levels of alert that can appear when you sign a prescription. Organisations can configure their alerts and choose whether alert levels 1 to 3 are pre-acknowledged or need acknowledgement. Level 4 alerts need acknowledgement and justification.
-
When you prescribe duplicate order sets, an alert appears.
-
When you prescribe an order set containing duplicate medications, no alert appears.
-
If estimated or reported height and weight are used to calculate a dose quantity, a level 4 alert appears. Your organisation decides if estimated height and weight can be used to calculate a dose.
|
Alerts |
Shows all clinical decision support, except interactions between drugs or drug classes |
|
Stockley Drug-Drug Interactions |
Shows interactions between drugs or drug classes. |
|
|
Shown next to pre-acknowledged alerts. |
|
|
Shown next to alerts that need acknowledgement. Select to acknowledge the alert. Selecting makes Notes mandatory. You must enter a reason before you proceed. This is fully auditable. |
Signing a prescription
The final step of prescribing is signing the prescription.
You can:
-
Sign the prescription
To sign the prescription, finish acknowledging alerts, enter any notes, and select Sign.
Prescriptions are added to the MAR, and can be administered.
-
Save the prescription as a draft
Depending on your organisation, you can save the prescription as a draft. To save a prescription as a draft, select Save as draft.
Draft medications don't appear on the MAR, and they can't be administered until they are signed.
-
Sign and administer the prescription
-
Delete the prescription
Select Delete prescription to delete the prescription.
Prescribing and administering medication in a single step
In some situations, a clinical user might need to prescribe and administer medications at the same time. For example, an anaesthetist working in surgery might prescribe and administer antibiotics or pain relief.
Medications that you can prescribe and administer as a single step are configured by your organisation and are limited to stat medications.
To sign and administer a prescription:
-
Follow the steps for prescribing a medication.
-
Acknowledge alerts and enter any notes.
-
Select Sign & record as given.
-
Check the date and time are correct for when you administered the dose.
If not, enter the correct date and time.
-
Select Confirm.
Editing or signing a draft prescription
If your organisation allows saving draft prescriptions, you can open a draft prescription and edit or sign it.
There is a time limit for signing drafts. Any draft prescriptions must be signed within 24 hours of becoming a draft.
-
From Inpatients > Patient List > double-click on a patient's name > Patient Detail, select Meds > .
-
Select the draft prescription from Draft.
-
Select Modify prescription to edit the draft prescription, or Sign selected prescriptions to sign the draft prescription.
-
Make changes, acknowledge any alerts, and enter notes as needed.
-
Select Sign, or save the modified prescription as a draft.
Viewing a dose calculation
You can view information about how Nervecentre calculated the dose of medication needed using the patient's weight.
This information appears in the events log. Select the name of a medication on the MAR chart to view the events log.
Did you find this article helpful? Yes No
Sorry about that. Our help is a work in progress and we welcome any feedback.
Why wasn't this helpful? Please select one reason:
Great!
Thanks for taking the time to give us some feedback.