Nervecentre V9.0 Help for Users
Viewing and managing a patient's preadmissions
You can view and manage a patient's preadmissions from Patient Detail > Patient admin > Show pathways > TCI. You can edit or cancel a preadmission. You can admit a patient with a preadmission, or record that they didn't attend.
Viewing and managing a patient's preadmissions on a mobile
You can't do this on a mobile.
Viewing and managing a patient's preadmissions on a desktop
 Overview of Patient admin > Show pathways > TCI
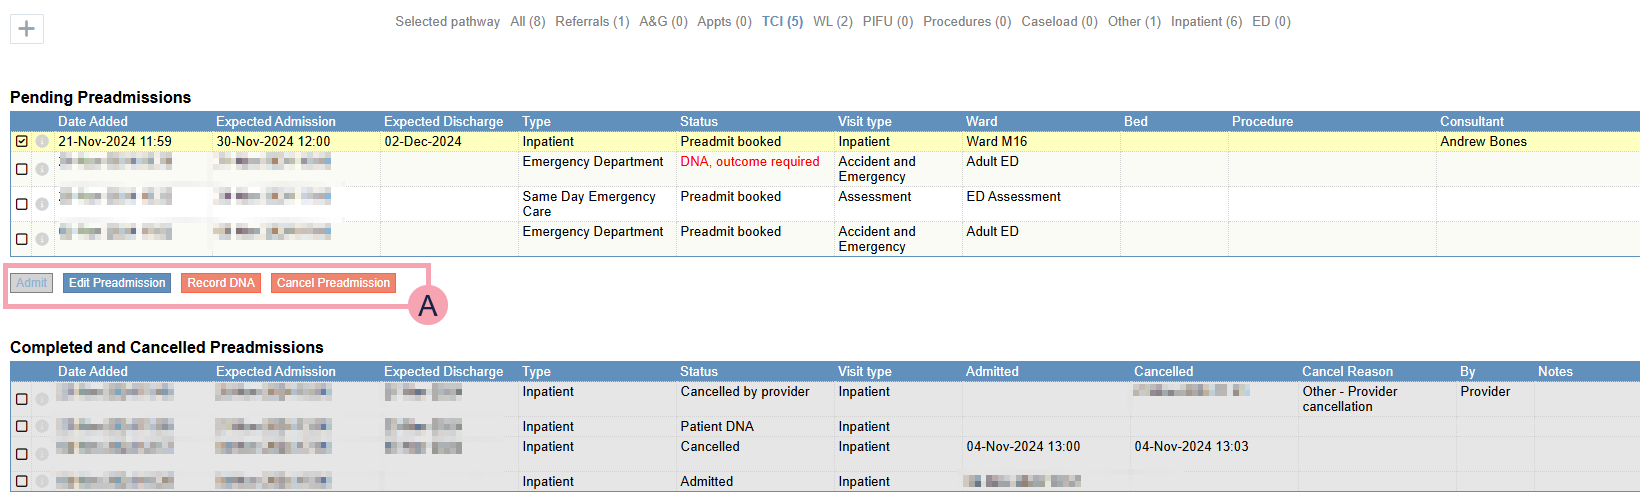
From Patient Detail > Patient admin > Show pathways > TCI, you can view and manage a patient's preadmissions.
|
+ |
Select to add a new preadmission to an existing episode of care. Read more about creating a preadmission in an existing episode |
|
Pending Preadmissions |
Shows upcoming admissions for the patient. |
|
|
Select to view information about the preadmission. |

|
The actions available for the selected preadmission. These depend on the preadmission's status, and the date of the expected admission. You can:
|
|
Completed and Cancelled Preadmissions |
Shows completed and cancelled preadmissions. |
Viewing details about a preadmission
-
Open the patient's record.
-
From Outpatients > Patient Detail, search for the patient.
-
From Inpatients > Patient Detail, search for the patient.
-
-
From Patient Detail > Patient admin > Show pathways, select TCI.
-
Select next to a preadmission.
You can:
-
Admit the patient using that preadmission
-
Record that the patient Did Not Attend (DNA Did Not Attend.)
-
Edit the preadmission
-
Edit the preadmission form
-
Cancel the preadmission
-
Add a note
-
Deleting a preadmission
If you created a draft preadmission in error, you can delete the draft preadmission. If the preadmission is no longer a draft, you must cancel the preadmission, or record a DNA Did Not Attend..
Read more about cancelling a preadmission
Read more about recording a DNA
To delete a draft preadmission:
-
Open the patient's record.
-
From Outpatients > Patient Detail, search for the patient.
-
From Inpatients > Patient Detail, search for the patient.
-
-
From Patient Detail > Patient admin > Show pathways, select TCI.
-
From Pending Preadmissions, select the preadmission, or select next to a preadmission.
-
Select Delete Preadmission.
Editing a preadmission
You can edit a preadmission to change the date and time you expect the patient to arrive for admission, and to change the ward and bed the patient is admitted to when they arrive.
-
Find the patient's preadmission.
-
From Inpatients > Expects, search for the patient.
-
From Inpatients or Outpatients > Patient Detail, search for the patient. Select Patient admin > Preadmit > Show pathways > TCI.
-
- Select next to a preadmission.
-
Select Edit Preadmission.
-
From Edit Preadmission, select if you want to edit an existing preadmission, or cancel the existing preadmission and book a new preadmission.
-
If you are editing an existing preadmission, enter the time you expect the patient to arrive.
If you are cancelling the existing preadmission and booking a new preadmission, select the date and time of the new preadmission.
-
Select the ward the patient is admitted to when they arrive.
If the patient has a bed reservation and you change the ward, Nervecentre clears the bed reservation.
-
Select the bed the patient is admitted to when they arrive.
If the patient has a bed reservation for a scheduled procedure, you can't change the bed here.
-
If you are cancelling the existing preadmission and booking a new preadmission, select who cancelled the existing preadmission and the reason they are cancelling.
Enter any notes.
-
Select Update.
-
Select a correspondence option to change who the letters are sent to.
To not send the letters, select None.
The options you see depend on your organisation.
-
Select Click to preview letters.
The letters appear in your organisation's PDF viewer.
A list of letters appears on the right. This shows the recipient of each letter and how the letter is delivered. For example, 'GP - MESH' or 'Patient - Manual print'. To view a letter, select view.
You can also see information about the patient's preferred method of receiving letters, and preferred letter format.
-
Depending on your permissions, if Nervecentre is sending a patient's letter by the patient's preferred delivery method, by Docmail, or by email, you can choose to manually print and send the letter instead.
To manually print and send a patient's letter, select Prevent sending of this letter, I will manually print it instead.
-
Select Send.
Editing a preadmission form
From Case Notes, you can view a preadmission form after it has been submitted.
From Patient admin, you can view and edit a preadmission form after it has been submitted. The form shows the current values, and not the values from when the form was submitted. Changes you make to the preadmission form don't cause Nervecentre to send new letters.
-
Open the patient's record.
-
From Outpatients > Patient Detail, search for the patient.
-
From Inpatients > Patient Detail, search for the patient.
-
-
From Patient Detail > Patient admin > Show pathways, select TCI.
-
From Pending Preadmissions, select next to a preadmission.
-
Select Preadmit Form.
-
Select fields on the form to edit them.
-
To save and leave the form, select Close.
Sending an ad hoc letter or SMS message about a patient's future admission
You can send an ad hoc letter or SMS message about a patient's preadmission from Patient Detail > Patient admin. Depending on your permissions, you can also send ad hoc letters and SMS messages about preadmissions from Outpatients > Manage.
Read more about sending ad hoc letters and SMS messages from Manage
To send an ad hoc letter or SMS message about a preadmission:
-
Open the patient's record.
-
From Inpatients, select Patient List > double-click on a patient's name > Patient Detail.
-
From Outpatients, select Clinic List > double-click on a patient's name > Patient Detail.
-
-
From Patient Detail > Patient admin > Show pathways > TCI, select a preadmission.
-
Select Send TCI Letter.
-
From Letter, select the letter you want to send.
Information about the letter appears. This includes:
-
The letter's name
-
The recipient of the letter
-
How the letter is delivered
-
When Nervecentre sends the letter
For example, immediately, at a set time, or after a delay.
-
Any attachments automatically added to the letter
-
-
Optional: edit the name of the letter.
-
Optional: to add attachments to the letter:
-
Select .
-
Search for an attachment, or browse folders until you find an attachment.
-
Select an attachment.
-
Select .
-
Select outside the dialogue box.
-
To save the attachments you added, select Yes.
-
-
To preview the letter, select Preview.
-
To sign a letter, or to remove a signature from a letter:
-
Select Sign off.
-
Select an option.
-
To sign the letter with your name, select Sign.
-
To sign the letter for someone else, select Sign as, then select their name.
-
To remove a signature from the letter, select Un-sign.
-
-
-
Send the letter.
-
To send the letter after any specified delay, select Send.
-
To send the letter immediately with no delay, select Send without Delay.
-
Automatic cancellation of preadmissions
Nervecentre can automatically cancel some preadmissions.
For example:
-
If a patient called NHS 111 to cancel their appointment at UEC, NHS 111 can send a cancellation message to Nervecentre. Nervecentre then cancels the preadmission.
-
If a patient's planned procedure was cancelled, Nervecentre cancels the preadmission for that procedure.
Cancelling a preadmission
-
Find the patient's preadmission.
-
From Inpatients > Expects, search for the patient.
-
From Inpatients or Outpatients > Patient Detail, search for the patient. Select Patient admin > Preadmit > Show pathways > TCI.
-
- Select next to a preadmission.
-
Select Cancel Preadmission.
-
For some types of preadmission, you can return the patient to a waiting list. For example, a preadmission for a procedure.
From Return to Waiting List, select an option.
-
Select who cancelled the preadmission.
For example, the patient, or the provider.
-
Select why they cancelled the preadmission.
-
Enter any notes.
-
Select Confirm.
-
Select a correspondence option to change who the letters are sent to.
To not send the letters, select None.
The options you see depend on your organisation.
-
Select Click to preview letters.
The letters appear in your organisation's PDF viewer.
A list of letters appears on the right. This shows the recipient of each letter and how the letter is delivered. For example, 'GP - MESH' or 'Patient - Manual print'. To view a letter, select view.
You can also see information about the patient's preferred method of receiving letters, and preferred letter format.
-
Depending on your permissions, if Nervecentre is sending a patient's letter by the patient's preferred delivery method, by Docmail, or by email, you can choose to manually print and send the letter instead.
To manually print and send a patient's letter, select Prevent sending of this letter, I will manually print it instead.
-
Select Send.
Admitting a patient who has a preadmission
On the day a patient is expected to arrive, you can admit a patient using their preadmission.
-
Find the patient's preadmission.
-
From Inpatients > Expects, search for the patient.
-
From Inpatients or Outpatients > Patient Detail, search for the patient. Select Patient admin > Preadmit > Show pathways > TCI.
-
-
Select next to the patient's preadmission.
-
Select Admit.
-
Complete the form, including all mandatory fields.
Mandatory fields are marked .
-
Select Admit.
Depending on your organisation, Nervecentre checks PDS for information about the patient.
The label on this button depends on the type of visit. For example, a visit to an inpatient ward, or a visit to SDEC.
Recording that a patient didn't attend
-
Find the patient's preadmission.
-
From Inpatients > Expects, search for the patient.
-
From Inpatients or Outpatients > Patient Detail, search for the patient. Select Patient admin > Preadmit > Show pathways > TCI.
-
- Select next to the patient's preadmission.
-
Select Record DNA.
-
Select the reason the patient didn't attend.
-
Enter any notes.
-
Select Continue.
The preadmission's status changes to 'DNA, outcome required'.
Removing DNA from a preadmission marked as DNA
If you recorded that a patient didn't attend in error, and you have not yet recorded the outcome, you can remove DNA from the preadmission.
-
Find the patient's preadmission.
-
From Inpatients > Expects, search for the patient.
-
From Inpatients or Outpatients > Patient Detail, search for the patient. Select Patient admin > Preadmit > Show pathways > TCI.
-
- Select next to the patient's preadmission.
-
Select Undo DNA > Yes.
Recording the outcome for a patient who didn't attend
-
Open the patient's record.
-
From Outpatients > Patient Detail, search for the patient.
-
From Inpatients > Patient Detail, search for the patient.
-
-
From Patient Detail > Patient admin > Show pathways, select TCI.
-
From Pending Preadmissions, select a preadmission with the status 'DNA, outcome required'.
-
Select Outcome DNA.
A form appears.
-
From Outcome, select an outcome.
More options appear. These options depend on the outcome you chose.
-
Select options until Continue appears.
-
Select Continue.
What appears next depends on the options you chose.
One of the following appears:
-
Future Activity
You must decide what happens to other activities related to the preadmission.
-
Actions Taken / Required
Shows any actions Nervecentre has automatically done. For example, added the patient to a PIFU list or waiting list.
Shows any actions you need to do before you can record the outcome. For example, list a procedure, or book an appointment.
-
No Actions Required
Appears when you don't need to anything other than record the outcome.
-
-
Select Complete Outcome.
-
Optional: depending on the outcome you selected, you can send letters about that outcome.
For example, you might need to send letters when you discharge a patient, or add them to a waiting list.
-
Select a correspondence option to change who the letters are sent to.
To not send the letters, select None.
The options you see depend on your organisation.
-
Select Click to preview letters.
The letters appear in your organisation's PDF viewer.
A list of letters appears on the right. This shows the recipient of each letter and how the letter is delivered. For example, 'GP - MESH' or 'Patient - Manual print'. To view a letter, select view.
You can also see information about the patient's preferred method of receiving letters, and preferred letter format.
-
Depending on your permissions, if Nervecentre is sending a patient's letter by the patient's preferred delivery method, by Docmail, or by email, you can choose to manually print and send the letter instead.
To manually print and send a patient's letter, select Prevent sending of this letter, I will manually print it instead.
-
Select Send.
-
Did you find this article helpful? Yes No
Sorry about that. Our help is a work in progress and we welcome any feedback.
Why wasn't this helpful? Please select one reason:
Great!
Thanks for taking the time to give us some feedback.