Nervecentre V9.0 Help for Users
Taking a photo of a patient
You can take, replace, and delete a photo of a patient on mobile and desktop.
Taking a photo of a patient on a mobile
 About taking a photo on a mobile
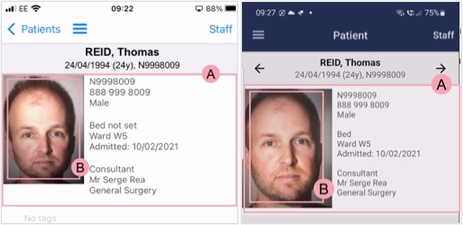
On a mobile, you can view the main photo against the patient record for identification purposes, add a photo if the section is blank, or replace a photo if necessary.
|
|
Patient banner |
|
|
Patient ID photo. Select to open the camera. |

 About recording consent
Recording consent in Nervecentre is not intended to replace any policy or procedure relating to consent in your organisation. However, you must select the type of consent you obtained.
You can't amend the patient consent response.
Scanning the patient's wristband on iOS
To use your mobile to take a photo of a patient, you must scan the patient’s wristband.
-
From any patient list, select and hold any patient's name.
The camera opens.
-
Scan the patient's wristband.
You might be able to turn on a torch to see the QR code better. Select Toggle Torch to turn your torch on and off.
If the patient is on your list, the record opens immediately. If not, you see a message asking if you want to search for the patient. Select Yes.
Scanning the patient's wristband on Android
To use your mobile to take a photo of a patient, you must scan the patient’s wristband.
-
From any patient list, select .
The camera opens.
-
Scan the patient's wristband.
You might be able to turn on a torch to see the QR code better. Select to turn on your torch. Select to turn off your torch.
If the patient is on your list, the record opens immediately. If not, you see a message asking if you want to search for the patient. Select Yes.
Taking the first photo
-
Scan the patient’s wristband.
-
From the patient banner, select the blank photo section to the left of the patient information.
-
Take a photo.
-
To keep this photo, select Use Photo.
-
To retake the photo, select Retake.
-
Select an option to record the patient’s consent to take and use the photo.
Replacing a photo
You can replace the photo at any time during the patient’s visit, for example, if the patient’s appearance has changed.
-
Scan the patient’s wristband.
-
From the patient banner, select the photo to the left of the patient information.
-
Take a photo.
-
To keep this photo, select Use Photo.
-
To retake the photo, select Retake.
-
Select an option to record the patient’s consent to take and use the photo.
Deleting a photo
You can’t delete a photo from your mobile.
Taking a photo of a patient on a desktop
About taking a photo on a desktop
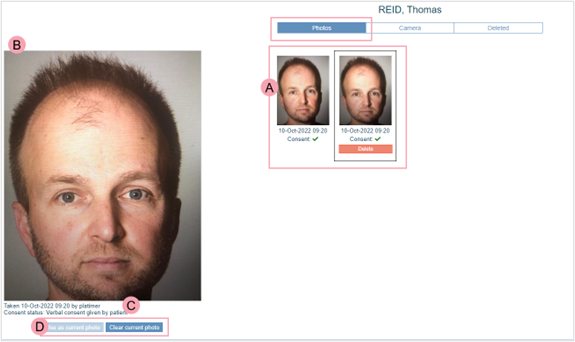
From Patient Detail > Summary > Photos, you can take a photo, and view, replace, and manage all current photos of the patient.
|
|
Photos of the patient. Select to view or delete a photo. |
|
|
The current photo associated with the patient. |
|
|
Information about the photo, including the date, time, user credentials, and consent status. |
|
|
Select to use a current photo or remove the photo from the patient banner. |
|
Photos |
Select to view the current photos. |
|
Camera |
Select to take photos. |
|
Deleted |
Select to view deleted photos. |


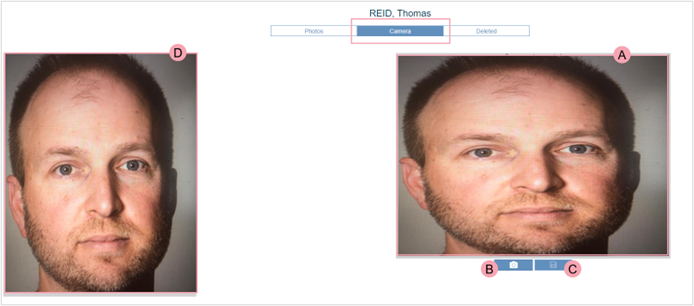
From Camera, you can take a photo using a webcam.
|
|
Photo viewfinder. |
|
|
Select this to take a photo. |
|
|
Select this to save the image, and record consent. |
|
|
The most recently taken photo. |
About recording consent
Recording consent in Nervecentre is not intended to replace any policy or procedure relating to consent in your organisation. However, you must select the type of consent you obtained.
You can't amend the patient consent response.
Taking the first photo
-
Open the patient's record.
-
From Inpatients, select Patient List > double-click on a patient's name > Patient Detail.
-
From Outpatients, select Clinic List > double-click on a patient's name > Patient Detail.
-
-
Select Summary.
-
Select .
Any current photos appear on the left-hand side. The viewfinder for the camera appears on the right.
-
Select to take a photo.
-
Once you are happy with the photo, select .
-
Select an option to record the patient's consent to take and use the photo.
Replacing a photo
You can replace a photo with a saved photo or a new photo. You must have permissions to replace a photo with a saved photo.
-
Open the patient's record.
-
From Inpatients, select Patient List > double-click on a patient's name > Patient Detail.
-
From Outpatients, select Clinic List > double-click on a patient's name > Patient Detail.
-
-
Select the patient's photo from the banner.
-
To replace the photo with an existing photo:
-
Select Photos from the header.
-
Select an image from a previous date and time.
-
Select Use as current photo.
Or, to replace the photo with a new photo:
-
Select Camera.
-
Select to take a photo.
-
Once you are happy with the photo, select .
-
-
Select an option to record the patient's consent to take and use the photo.
Deleting a photo
Photos can be deleted from the record, in the case of the incorrect patient.
Deleted images are deleted from clinical pages, however they remain in the record against the patient in the database.
You can't replace the patient's photo with a deleted photo.
-
Open the patient's record.
-
From Inpatients, select Patient List > double-click on a patient's name > Patient Detail.
-
From Outpatients, select Clinic List > double-click on a patient's name > Patient Detail.
-
-
Select the patient's photo from the banner.
-
Select Photos from the header.
-
Mouseover an image and select Delete.
Viewing deleted photos
If you have the correct permissions, you can view deleted photos.
-
Open the patient's record.
-
From Inpatients, select Patient List > double-click on a patient's name > Patient Detail.
-
From Outpatients, select Clinic List > double-click on a patient's name > Patient Detail.
-
-
Select the patient's photo from the banner.
-
Select Deleted from the header.
Did you find this article helpful? Yes No
Sorry about that. Our help is a work in progress and we welcome any feedback.
Why wasn't this helpful? Please select one reason:
Great!
Thanks for taking the time to give us some feedback.