Nervecentre V9.0 Help for Users
Creating and managing pull lists
As a medical records manager, you can create, manage, and assign pull lists.
 What is a pull list?
A pull list is a list of case note volumes that need to go from one location to another. For example, you might have a pull list that contains all the loan requests from the Medical Records Library to Ward 15. A medical records manager assigns a pull list to a medical records clerk. The medical records clerk finds the case note volumes on that pull list and takes the volumes to the location that requested them.
Creating and managing pull lists on a mobile
You can't do this on a mobile.
Creating and managing pull lists on a desktop
Overview of Manage Pull Lists
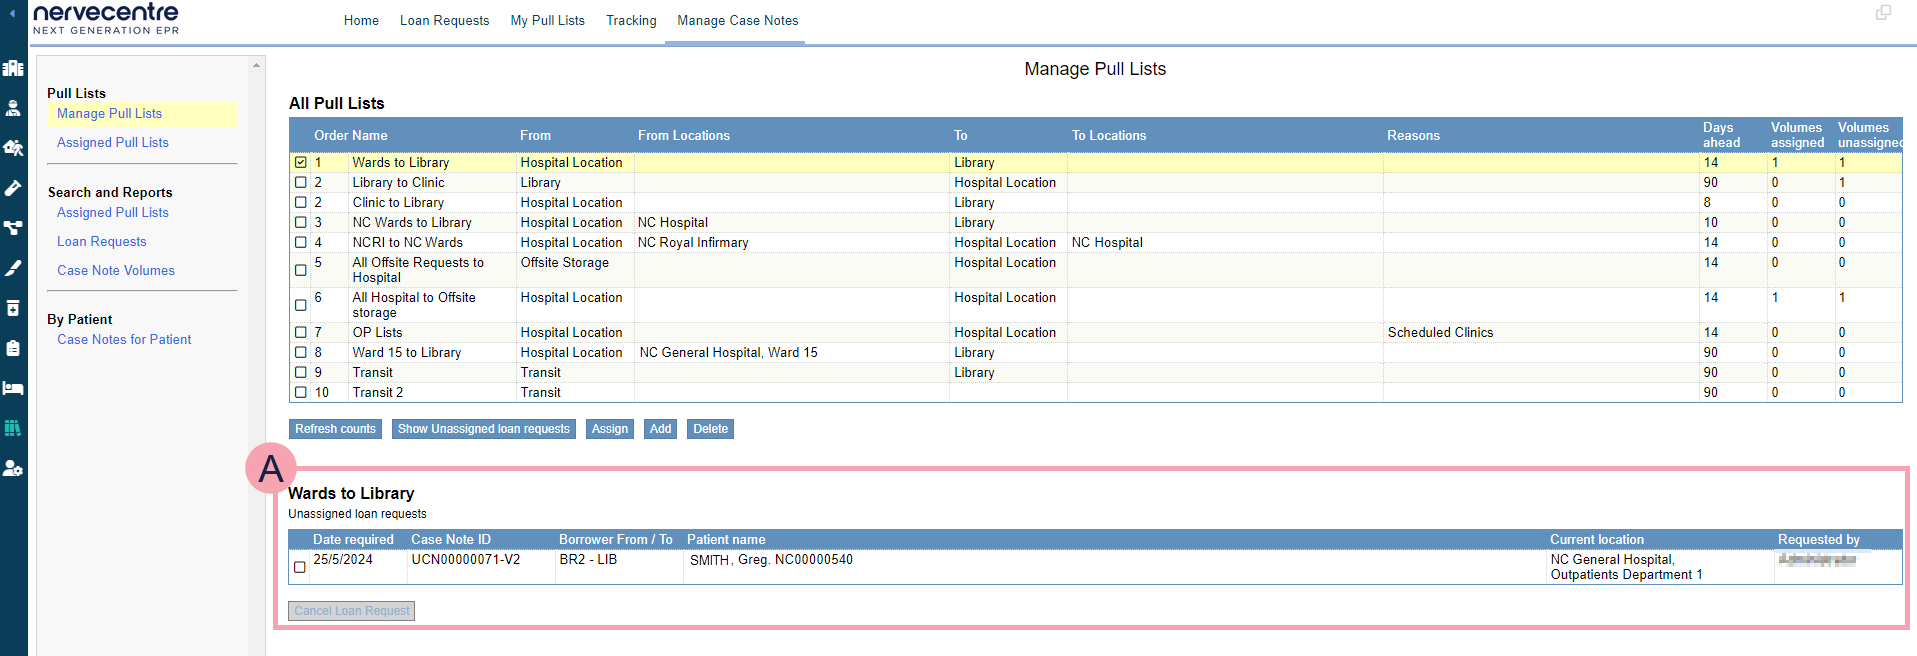
From Medical Records > Manage Case Notes > Pull Lists > Manage Pull Lists, you can create and assign pull lists.
|
Order |
Shows the order of the pull lists. When a loan request is made, Nervecentre places the loan request in the matching pull list. If a loan request matches multiple pull lists, then Nervecentre places the loan request in the pull list with lower number. For example, the loan request is going from a ward to the library, so Nervecentre places the request in pull list called 'Wards to Library'. |
|
Name |
Shows the name of the pull list. |
|
From |
Shows the type of location that case note volumes are going from. The pull list contains loan requests going from this type of location. For example, going from a hospital location. |
|
From Locations |
Shows the location that case note volumes are going from. The pull list contains loan requests going from this location. For example, going from Ward 15 in the hospital. |
|
To |
Shows the type of location that case note volumes are going to. The pull list contains loan requests going to this type of location. For example, going to a library. |
|
To Locations |
Shows the location that case note volumes are going to. The pull list contains loan requests going to this location. For example, going to a specific clinic. |
|
Reasons |
Shows the reason the case note volume was requested. The pull list contains loan requests with this reason. For example, a case note volume might be requested when a patient has an appointment at a clinic. When the case note volume is requested, the reason chosen is 'Scheduled clinic'. |
|
Days ahead |
Shows when Nervecentre can place a loan request in the pull list. For example, a loan request is made 15 days before the case note volume is needed. If the pull list is set to 10 days ahead, the loan request only appears on the pull list 10 days before the case note volume is needed. Double-click to edit the number of days. |
|
Volumes assigned |
Shows the number of loan requests in this pull list that are assigned. |
|
Volumes unassigned |
Shows the number of loan requests in this pull list that are unassigned. |
|
Refresh counts |
Select to refresh the number of unassigned and assigned pull lists. |
|
Show Unassigned loan requests |
Select to view unassigned loan requests. |
|
Assign |
Select to assign a pull list to a medical records clerk. |
|
Add |
Select to add a pull list. |
|
Delete |
Select to delete the selected pull list. |
|
|
Shows unassigned loan requests for the selected pull list. |
|
Date required |
Shows the date a case note volume needs to be its destination. For example, if a case note volume is going from a ward back to the library, this is the date the case note volume needs to be in the library. |
|
Case Note ID |
Shows the ID for the case note volume. |
|
Borrower From / To |
Shows the borrower codes for:
|
|
Patient name |
Shows the name of the patient. |
|
Current location |
Shows the current location of the case note volume. |
|
Requested by |
Shows the name of the user who made the loan request. |
|
Assign Selected Loans |
Select to assign the selected loan requests. |
|
Cancel Selected Loans |
Select to cancel the selected loan requests. |
 Adding a pull list
-
From Medical Records > Manage Case Notes > Pull Lists > Manage Pull Lists, select Add.
-
Complete the fields using the table below.
Run order
Enter a number.
When a loan request is made, Nervecentre places the loan request in the matching pull list. If a loan request matches multiple pull lists, then Nervecentre places the loan request in the pull list with the lower number.
You can have more than one pull list with the same number in run order, but those pull lists must have different criteria. For example, different from and to locations.
You must not create a pull list with the same criteria and the same number in run order.
Name
Enter a name for the pull list.
For example, 'Wards to Library'.
From Borrower Type
Select a type of borrower.
The pull list contains loan requests going from this type of location.
For example, going from a hospital location.
From Location
Select a location.
The pull list contains loan requests going from this location.
For example, going from ward 15 in the hospital.
To Borrower Type
Select a type of borrower.
The pull list contains loan requests going to this type of location.
For example, going to a library.
To Location
Select a location.
The pull list contains loan requests going to this location.
For example, going to a specific clinic.
Restrict to reasons
Select a reason for the loan request. You can select multiple reasons.
The pull list contains loan requests with this reason.
For example, a case note volume might be requested when a patient has an appointment at a clinic. When the case note volume is requested, the reason chosen is 'Scheduled clinic'.
Days ahead
Enter a number of days.
Nervecentre places loan requests in this pull list X days before the case note volume is needed, where X is the number you enter.
For example, a loan request is made 15 days before the case note volume is needed. If the pull list is set to 10 days ahead, the loan request only appears on the pull list 10 days before the case note volume is needed.
-
Select Add.
Deleting a pull list
On a pull list, you can edit Days ahead, but you can't edit any other part of the pull list. If you need to edit a pull list, add a new pull list, then when you are happy with that pull list, delete the old pull list.
Make sure there are no loan requests on the pull list before you delete it.
To delete a pull list:
-
From Medical Records > Manage Case Notes > Pull Lists > Manage Pull Lists, select a pull list.
-
Select Delete.
Assigning a pull list
As a medical records manager, you can assign loan requests on a pull list to yourself or a specific staff member.
-
From Medical Records > Manage Case Notes > Pull Lists > Manage Pull Lists, select a pull list with unassigned loan requests.
-
Select Assign.
-
Select Assign to.
-
Select who you want to assign loan requests to.
-
To assign loan requests on the pull list to yourself, select Set to me.
-
To assign loan requests on the pull list to a staff member with a specific role:
-
Select All users with role n.
Where n is the name of a role. For example, medical records clerk.
-
Select a staff member from the list.
-
-
To assign loan requests on the pull list to a staff member:
-
Select All users.
-
Enter the name of the staff member.
-
Select Search.
-
Select the name of the staff member.
-
-
-
From Maximum volumes, enter the number of loan requests you want to assign.
For example, you might have 1000 loan requests in a pull list. As a medical records manager, you might want to assign 50 loan requests to a specific medical records clerk.
-
Select Add.
The numbers in Volumes unassigned and Volumes assigned update.
For example, originally you had 1000 unassigned loan requests and you assigned 50 loan requests. Volumes unassigned now shows 950 and Volumes assigned shows 50. Both unassigned and assigned loan requests remain on the pull list until those loan requests are completed.
Refreshing all pull lists
When a loan request is made, Nervecentre places the loan request in the matching pull list. You can view the number of loan requests in each pull list. To update the numbers shown, you must refresh the pull lists.
-
From Medical Records > Manage Case Notes > Pull Lists > Manage Pull Lists, select Refresh counts.
Overview of Pull Lists > Assigned Pull Lists
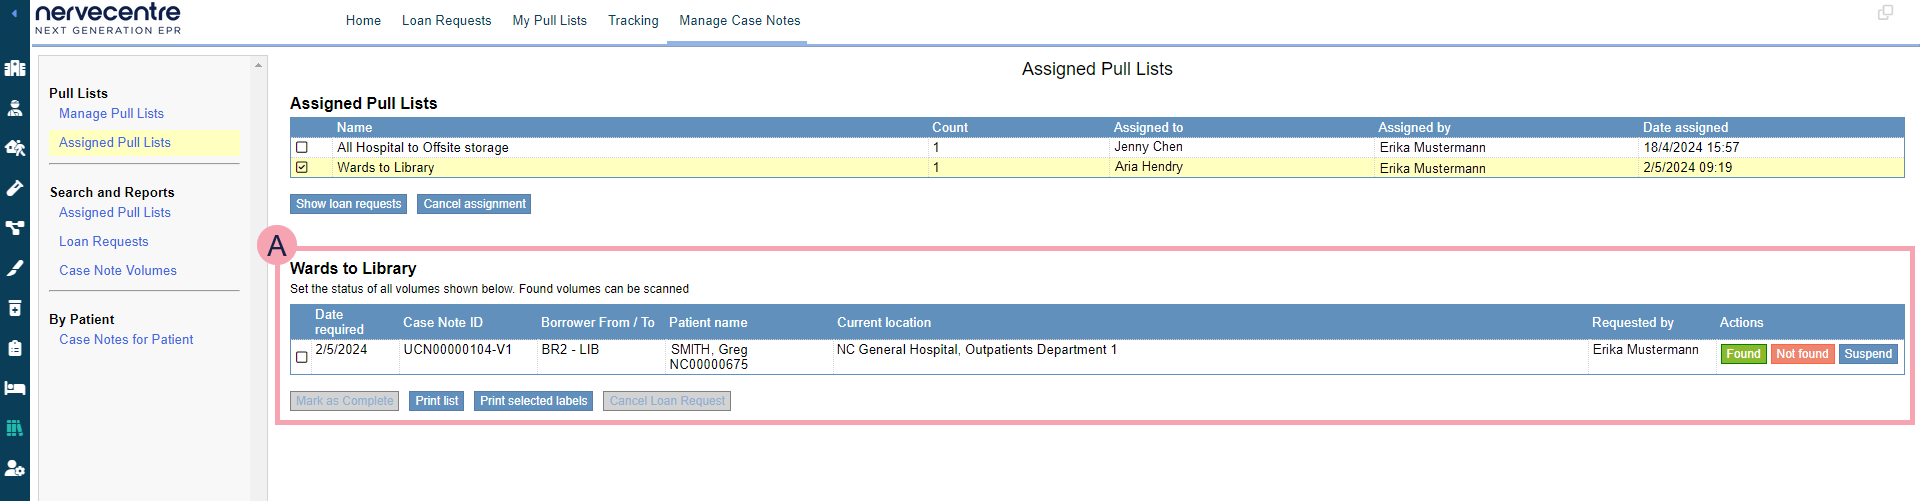
From Medical Records > Manage Case Notes > Pull Lists > Assigned Pull Lists, you can view and manage assigned pull lists.
|
Assigned Pull Lists |
Shows a list of pull lists with assigned loan requests. |
|
Name |
Shows the name of the pull list. |
|
Count |
Shows the number of loan requests that are assigned. |
|
Assigned to |
Shows the name of the user who has been assigned those loan requests. |
|
Assigned by |
Shows the name of the user who assigned the loan requests. |
|
Date assigned |
Shows the date and time the pull list was assigned. |
|
Show loan requests |
Select to view loan requests in the selected pull list. |
|
Cancel assignment |
Select to unassign the selected pull list. |
|
|
Shows the loan requests for the selected pull list. |
|
Date required |
Shows the date a case note volume must arrive at its destination. For example, if a case note volume is going from a ward back to the library, this is the date the case note volume must be in the library. |
|
Case Note ID |
Shows the ID for the case note volume. |
|
Borrower From / To |
Shows the borrower codes for:
|
|
Patient name |
Shows the name of the patient. |
|
Current location |
Shows the current location of the case note volume. |
|
Requested by |
Shows the name of the user who made the loan request. |
|
Actions |
Select an action.
|
|
Mark as complete |
Select to mark the loan request as complete. |
|
Print list |
Select to print a list of the loan requests. |
|
Print selected labels |
Select to print labels for the selected case note volumes. |
|
Cancel loan request |
Select to cancel the selected loan request. |
Unassigning a pull list
You can unassign a pull list. You might do this if you know that the person you assigned the pull list doesn't have time to complete the pull list.
-
From Medical Records > Manage Case Notes > Pull Lists > Assigned Pull Lists, select a pull list.
-
Select Cancel assignment.
-
Select Cancel assignment.
Did you find this article helpful? Yes No
Sorry about that. Our help is a work in progress and we welcome any feedback.
Why wasn't this helpful? Please select one reason:
Great!
Thanks for taking the time to give us some feedback.