Nervecentre V9.0 Help for Users
Updating camera clinical notes
upload photograph
Clinical photography allows you to take photos of your patient and store the photos in the patient's record.
Your organisation must:
-
Ensure all necessary patient consent processes are adhered to
-
Ensure that photos are used appropriately
-
Ensure that correct access is considered when setting permissions to view photos
-
Ensure it has guidelines in place about the quality of photos
Nervecentre makes no recommendation on the quality of photos and their ability to be used diagnostic purposes.
Updating camera clinical notes on a mobile
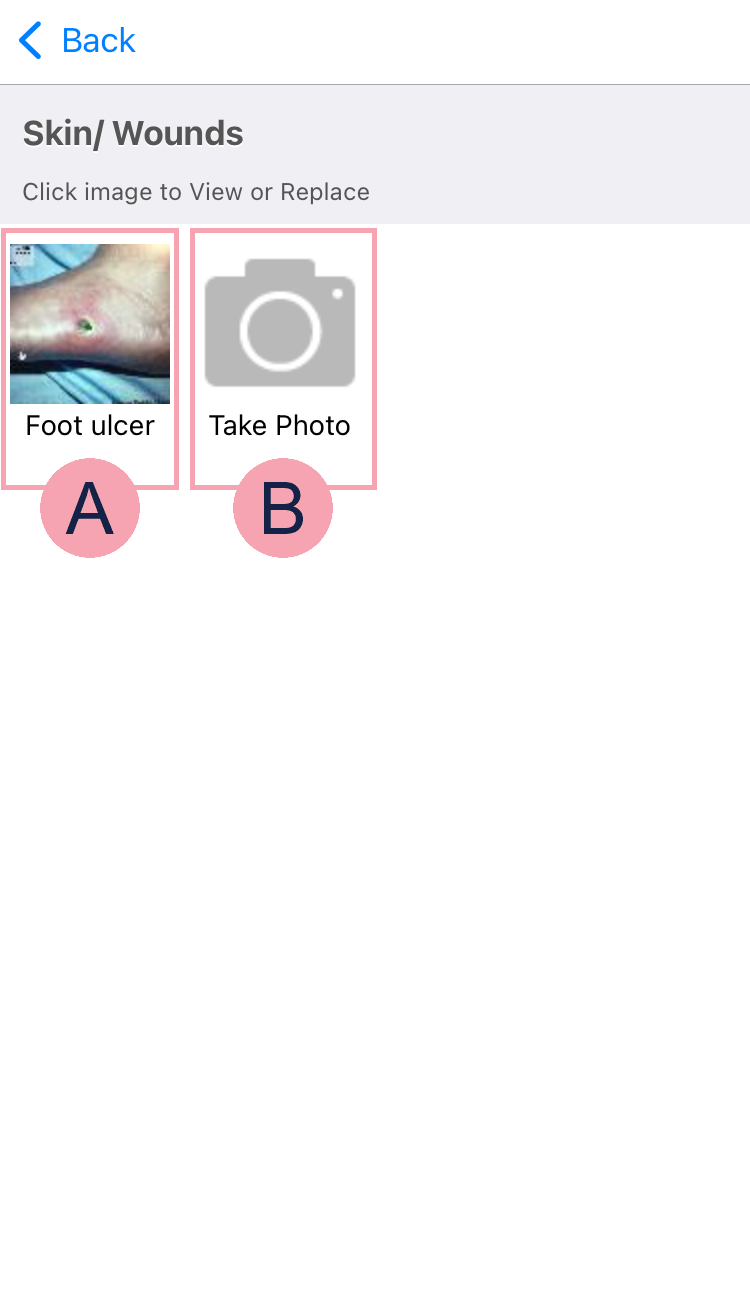
 Overview of a camera clinical note
You can view, take, and replace photos on a mobile.
Below is an example of a camera clinical note on a mobile.
|
|
Select a photo to view or replace the photo. Read more about replacing a photo On iOS, you can select the name of a photo to edit the name. |
|
|
Select Take Photo to take a photo. |

 Taking a photo
On iOS
-
Select a clinical note that allows you to take photos, for example, 'Skin / Wounds'.
-
Select Take Photo.
-
Take the photo.
-
Optional: to retake the photo, select Retake.
-
To save the photo, select Use Photo.
The photo is stored with a watermark that includes:
-
The patient's name
-
The patient's date of birth
-
-
Select Add title and enter a title for the photo.
On Android
-
Select a clinical note that allows you to take photos, for example, 'Skin / Wounds'.
-
Select +.
-
Take the photo.
You can select to turn the torch on and off.
-
Optional: to retake the photo, select RETAKE.
-
To save the photo, select USE PHOTO.
The photo is stored with a watermark that includes:
-
The patient's name
-
The patient's date of birth
-
-
Select Add title and enter a title for the photo.
Replacing a photo
On iOS
-
Select a clinical note that allows you to take photos, for example, 'Skin / Wounds'.
-
Select the photo to be replaced.
-
Select Replace.
-
Take the photo.
-
Optional: to retake the photo, select Retake.
-
To save the photo, select Use Photo.
The photo is stored with a watermark that includes:
-
The patient's name
-
The patient's date of birth
-
On Android
-
Select a clinical note that allows you to take photos, for example, 'Skin / Wounds'.
-
Select the photo to be replaced.
-
Select Replace.
-
Take the photo.
You can select to turn the torch on and off.
-
Optional: to retake the photo, select RETAKE.
-
To save the photo, select USE PHOTO.
The photo is stored with a watermark that includes:
-
The patient's name
-
The patient's date of birth
-
Editing the name of a photo
On iOS
-
Select a clinical note that allows you to take photos, for example, 'Skin / Wounds'.
-
Select the name of the image.
-
Delete the original name and replace with the new name.
On Android
-
Select a clinical note that allows you to take photos, for example, 'Skin / Wounds'.
-
Select the image.
-
Select the name of the image.
-
Delete the original name and replace with the new name.
Updating camera clinical notes on a desktop
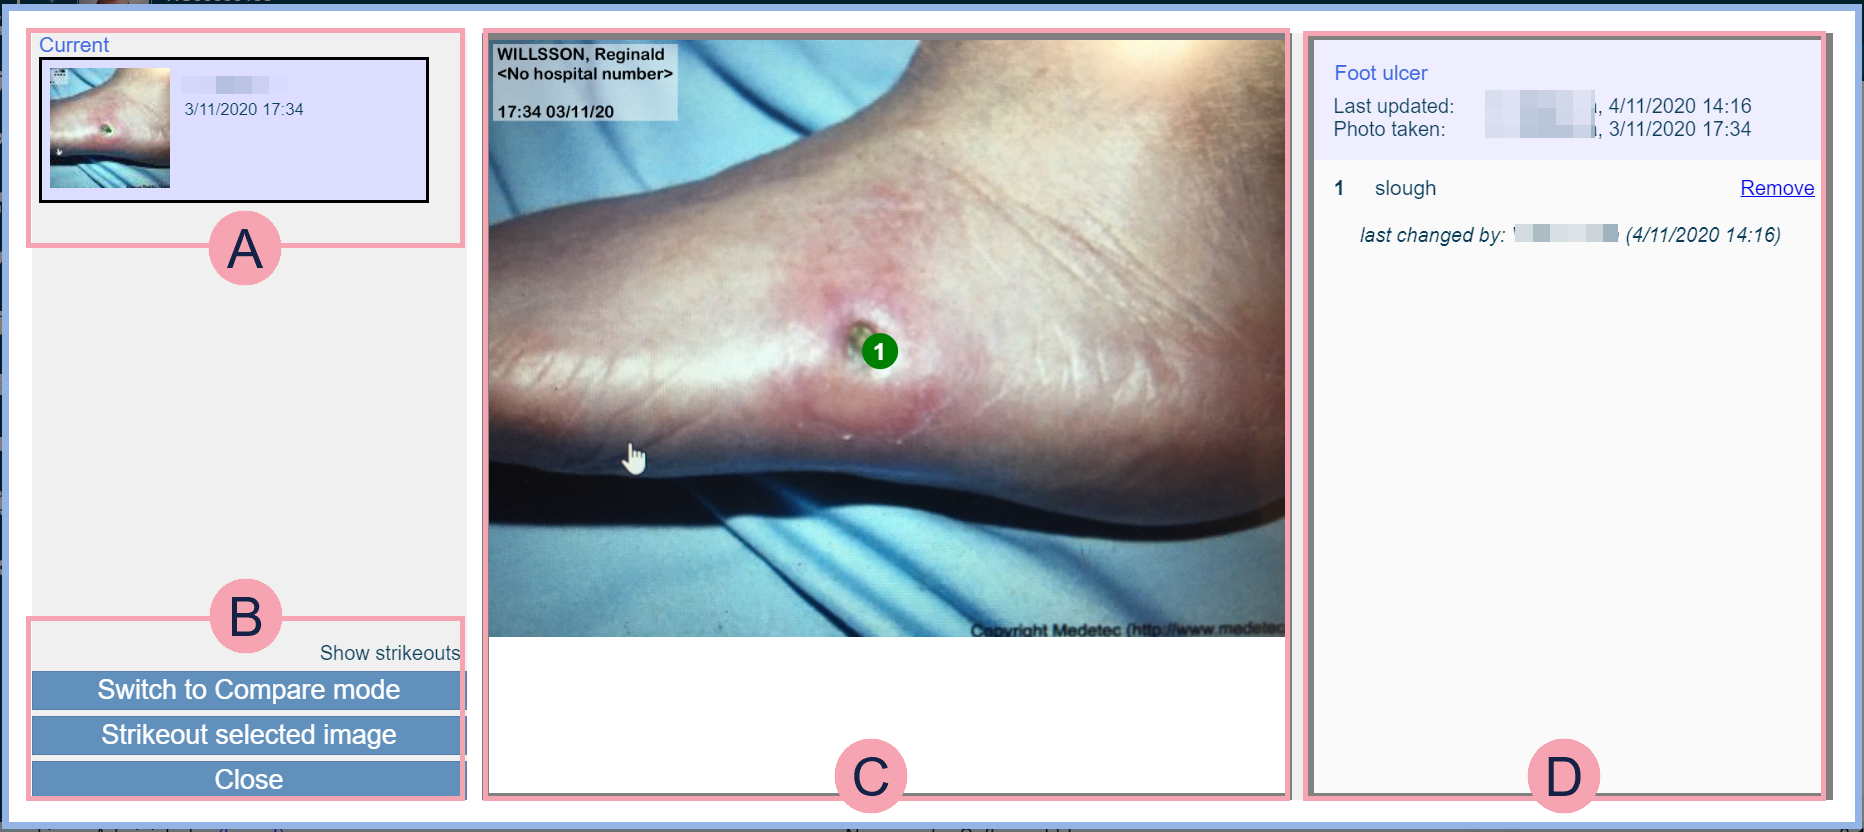
Overview of a camera clinical note
You can view, annotate, strike out, and compare images. You can’t take a photo on the desktop.
Below is an example of a camera clinical note on a desktop.
|
|
Select an image to view it. |
|
|
Select Show strikeouts to include struck out images in the list. Select Switch to Compare mode to compare images. Read more about comparing images Select Strikeout selected image to strike out the selected image. Read more about striking out an image Select Close to leave the image viewer. |
|
|
Shows the selected image. Select a point on the image to add a numbered label. Drag a number to move it to another position. |
|
|
Shows the name of the image, the user who took the image, when the image was taken, the user who updated the image, and when the image was updated. Select the name of the image to enter a new name. Read more about editing the name of an image Select a number in the list to add an annotation. Select Remove to remove an annotation. |

 Annotating a photo
-
Find a clinical note that has photos, for example, 'Skin / Wounds'.
-
Select the thumbnail in the clinical note.
-
Select a part of the image.
A number appears on the image and in the list on the right.
You can drag the number on the image to another position.
-
In the panel on the right, select the box next to the number.
-
Enter any notes.
To remove an annotation, select Remove next to the annotation.
-
Select Close, then select an option.
-
To save your changes, select Yes, save my changes
-
To not save your changes, select No, discard my changes
-
To keep annotating and comparing images, select No, stay on this page
-
Striking out an image
-
Find a clinical note that has photos, for example, 'Skin / Wounds'.
-
Select the thumbnail in the clinical note.
-
Select an image.
-
Select Strikeout selected image.
-
Select Close, then select an option.
-
To save your changes, select Yes, save my changes
-
To not save your changes, select No, discard my changes
-
To keep annotating and comparing images, select No, stay on this page
-
Comparing images
-
Find a clinical note that has photos, for example, 'Skin / Wounds'.
-
Select the thumbnail in the clinical note.
-
Select Switch to Compare mode
-
Select the images to compare.
-
Select Switch to Single mode to revert back to a single image.
-
Select Close, then select an option.
-
To save your changes, select Yes, save my changes
-
To not save your changes, select No, discard my changes
-
To keep annotating and comparing images, select No, stay on this page
-
Annotations are not shown in compare mode.
Editing the name of an image
-
Find a clinical note that has photos, for example, 'Skin / Wounds'.
-
Select the thumbnail in the clinical note.
-
Select the name of the image.
-
Enter a new name.
-
Select Close, then select an option.
-
To save your changes, select Yes, save my changes
-
To not save your changes, select No, discard my changes
-
To keep annotating and comparing images, select No, stay on this page
-
Did you find this article helpful? Yes No
Sorry about that. Our help is a work in progress and we welcome any feedback.
Why wasn't this helpful? Please select one reason:
Great!
Thanks for taking the time to give us some feedback.