Nervecentre V9.0 Help for Users
You can record collections, partial collections, and samples that have not been collected.
Recording collections on a mobile
 Recording the collection of a sample
-
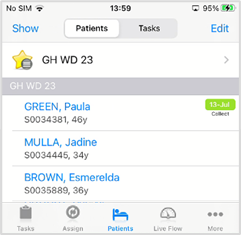
View your patient list.
-
On iOS, select Patients.
-
On Android, select > Patients.
-
-
View a list of options.
-
On iOS, select Show.
-
On Android, select and hold a patient's name.
-
-
Select Investigation Collection.
Patients with samples due show an indicator to the right of their name.
-
To access the patient’s details, scan their wristband, or select their name.
-
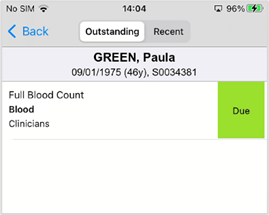
Scroll to Investigations and select Collections.
-
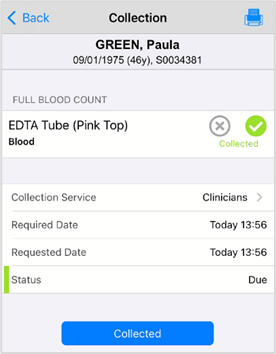
Select the collection you intend to take.
-
To confirm you have taken the sample, select > Collected.
-
To print labels and forms, select
 , select a printer, and print.
Print labels and forms separately. Check that you have selected the correct printer for each type of document.
Recording the partial collection or non collection of a sample
When taking samples, it might not be possible to obtain all the samples needed for that order. For example, you might be unable to obtain the specified amount of blood needed for all the samples. You might leave that sample aside temporarily and return to it, or ask someone else to take the sample later.
You can record samples as not collected. You must add a reason. Samples recorded as not collected remain as outstanding collections.
-
View your patient list.
-
On iOS, select Patients.
-
On Android, select > Patients.
-
-
View a list of options.
-
On iOS, select Show.
-
On Android, select and hold a patient's name.
-
-
Select Investigation Collection.
Patients with samples due show an indicator on the right of the screen.
-
To access the patient’s details, scan their wristband, or select their name.
-
Scroll to Investigations and select Collections.
-
Select the collection you intend to take.
-
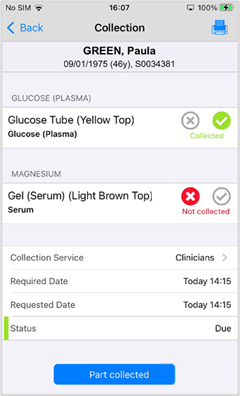
Select for each sample you collected.
Select for each sample you couldn’t collect.
-
If you recorded some samples as collected, select Part collected.
If you only recorded samples as not collected, select Not collected.
-
Check and confirm which samples have not been collected.
-
If you collected partial samples, Nervecentre automatically creates a new order for any samples you didn’t collect.
-
If you were unable to collect any samples, they remain outstanding in the original order.
-
-
Select a reason.
You can add supporting information as free text.
-
Optional: to reassign the collection, select a different collection service.
-
To print labels and forms, select
, select a printer, and print.Print labels and forms separately. Check that you have selected the correct printer for each type of document.
Recording collections on a desktop
Recording the collection of a sample
-
From Inpatients > Patient List > double-click on a patient's name > Patient Detail, select Investigations.
-
Select to view the outstanding collections.

-
Select Collected All to record the samples taken.
-
Confirm you have collected all samples.
The status updates to Collected.
-
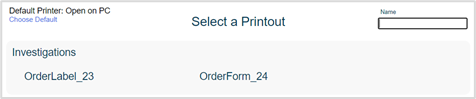
Select Print.
-
Optional: to choose a default printer, select Choose Default and select an option.
-
To open the document as a PDF file on your PC, select Open on PC.
-
To print from a printer in your current ward, select Current Ward.
-
To print from the default printer for the ward, select Default Printer for Area.
-
To print from a specific printer in the ward, select a printer.
-
-
To print from a specific printer on a specific ward, select By Ward, then select a ward and a printer.
-
To print from a specific printer that is not linked to a ward, select Other printers, and select a printer.
-
-
Select the order label or order form.
The form or label is printed at the default printer.
If your default printer is Open on PC, a PDF file opens. Print the PDF file.
-
To print both the order form and label:
-
Select one and print that.
-
Repeat this procedure.
-
Recording the partial collection or non collection of a sample
When taking samples, it might not be possible to obtain all the samples needed for that order. For example, you might be unable to obtain the specified amount of blood needed for all the samples. You might leave that sample aside temporarily and return to it, or ask someone else to take the sample later.
You can record samples as not collected. You must add a reason. Samples recorded as not collected remain as outstanding collections.
-
From Inpatients > Patient List > double-click on a patient's name > Patient Detail, select Investigations.
-
Select to view outstanding collections.
-
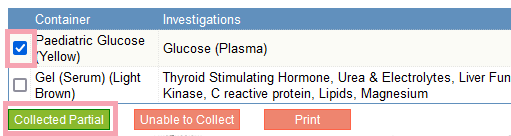
Select the samples that you have collected.
-
Select Collected Partial.
-
Select a reason.
You can add supporting information as free text.
-
Optional: to reassign the collection, select a different collection service.
-
Read and confirm which samples have not been collected.
The samples not obtained are struck out on the original collection and the status is Part Collected.
Nervecentre automatically creates a new order and collection for the samples not taken.
-
Select Print.
-
Optional: to choose a default printer, select Choose Default and select an option.
-
To open the document as a PDF file on your PC, select Open on PC.
-
To print from a printer in your current ward, select Current Ward.
-
To print from the default printer for the ward, select Default Printer for Area.
-
To print from a specific printer in the ward, select a printer.
-
-
To print from a specific printer on a specific ward, select By Ward, then select a ward and a printer.
-
To print from a specific printer that is not linked to a ward, select Other printers, and select a printer.
-
-
Select the order label or order form.
The form or label is printed at the default printer.
If your default printer is Open on PC, a PDF file opens. Print the PDF file.
-
To print both the order form and label:
-
Select one and print that.
-
Repeat this procedure.
-
Recording an order as not collected
You can record a whole order of samples as not collected. You must add a reason. Orders recorded as not collected will remain as outstanding collections.
If you were unable to collect specific samples in an order, mark the order as partially collected.
Read about recording the partial collection of a sample
-
From Inpatients > Patient List > double-click on a patient's name > Patient Detail, select Investigations.
-
Select to view the outstanding collections.
-
Underneath the order you are unable to collect, select Unable to collect.
-
Select a reason.
You can add supporting information as free text.
-
Optional: to reassign the collection, select a different collection service.
-
Read and confirm that you are unable to collect the samples.
The status updates to Not Collected.
Samples recorded as not collected remain outstanding.
Did you find this article helpful? Yes No
Sorry about that. Our help is a work in progress and we welcome any feedback.
Why wasn't this helpful? Please select one reason:
Great!
Thanks for taking the time to give us some feedback.